Working with images
Working with images
T-Menu supports using an Image for a MenuButtons, and also gives you control over the images state, e.g. mouse-over and mouse-down.
T-Menu also allows a developer to do the same thing for MenuItem images
In this lesson you will learn how to use the T-Menu image class, Note to anyone who does a bit of javascript (this is not the Image object) notice the difference in case of the 'i'.
In T-Menu's image object you can store a normal image and optionally a mouse over event image, a mouse down event image as well as width and height values.
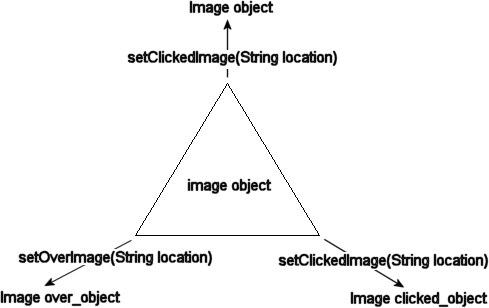
Some of you might find this easier to understand:
class image(various parameters)

{

object = new Image(); // can use image.setImage("example.gif");

over_object = new Image(); // can use image.setOverImage("example_over.gif");

clicked_object = new Image(); // can use image.setClickedImage("example_clicked.gif");


w = width; // Optional

h = height; // Optional

}
The API for image is very simple, providing you have included tmenu.js on the page you are able to create new instances of the image object.
Take a glance at the following piece of code:
var homeImage = new image("home.gif"); // Notice it is not "Image"
The object "homeImage" is understandable within T-Menu, you can easily pass it to MenuItems and MenuButtons (More on that later). "homeImage" is basically storing:
This code I'm just about to show you is OPTIONAL but it's probably best practice:
var homeImage = new image("home.gif", 100, 20);
The 2nd parameter (100) is the width of home.gif in pixels, the 3rd parameter (20) states the height of home.gif in pixels.
Providing you learned how to make Menus, MenuButtons and MenuItems before (in lessons 1 and 2) you should have no difficulty in attaching these image objects.
Understand the following piece of code:
var fileImage = new image("file.gif"); // define our File image


// instead of: var fileMenu = new Menu("File");

var fileMenu = new Menu(fileImage);
By creating the fileMenu object with the parameter of a image object instead of a text String we now have something that is identical in effect to a normal Menu except it will show the image "file.gif" instead of a plain text MenuButton with a down arrow.
This allows you to produce something like this:
Now here is the exact code for it (assuming css and js files are already included):
<script type="text/javascript">

var myMenuBar = new MenuBar(); // define a menu bar like normal


var fileImage = new image("file.gif"); // define an image


var fileMenu = new Menu(fileImage); // create a new Menu but with that image as the parameter


// Make some MenuItems

var newItem = new MenuItem("New", "javascript:void(0);");

var openItem = new MenuItem("Open", "javascript:void(0);");

var saveItem = new MenuItem("Save", "javascript:void(0);");

var exitItem = new MenuItem("Exit", "javascript:void(0);");


fileMenu.add(newItem);

fileMenu.add(openItem);

fileMenu.add(saveItem);

fileMenu.add(exitItem);


myMenuBar.add(fileMenu); // add Menu to the MenuBar


document.write(myMenuBar); // write the MenuBar

</script>
As you can see, pretty easy. Now as for mouse over and mouse down events, take a look at the following piece of code:
// define a File button Image just as we have done before.

var fileImage = new image("file.gif");


fileImage.setOverImage("file_over_image.gif");
If you used that fileImage object as you have done before it would do it all automatically!
fileImage.setClickedImage("file_clicked_image.gif");
ok, so let's build a File Menu with it's mouse over and mouse clicked events.
We'll use these three images:


Resuling Menu:
The exact code for that is (assuming the css and js files been included already):
<script type="text/javascript">

var myMenuBar = new MenuBar();


var fileImage = new image("file_1.gif");

fileImage.setOverImage("file_2.gif");

fileImage.setClickedImage("file_3.gif");


var fileMenu = new Menu(fileImage);


var newItem = new MenuItem("New", "javascript:void(0);");

var openItem = new MenuItem("Open", "javascript:void(0);");

var saveItem = new MenuItem("Save", "javascript:void(0);");

var exitItem = new MenuItem("Exit", "javascript:void(0);");


fileMenu.add(newItem);

fileMenu.add(openItem);

fileMenu.add(saveItem);

fileMenu.add(exitItem);


myMenuBar.add(fileMenu);


document.write(myMenuBar);

</script>
Next I will show you how to use an image for a MenuButton.
Before we defined a MenuButton like this:
var myButton = new MenuButton("Click me", "x.html");
Now we just replace the String parameter "Click me" with a image object (Just like we do with Menu)
Look at the following JavaScript:
var homeImage = new image("home.gif");

var homeButton = new MenuButton(homeImage, "index.html");
"homeButton" is ready to go, if you placed it on a MenuBar it would show the image "home.gif" instead of a text based Button.
Now that you know how to use the image class, it's time to show you how to add icons to MenuItems
There is a method on the MenuItem object called "setIconImage()", if you want an icon in a MenuItem define MenuItem as normal but afterwords assign it a image object it through the "setIconImage()" method.
Look at the following JavaScript:
var saIcon = new image("save_as.gif"); // define an image (this will be an icon)

var saveAsItem = new MenuItem("Save As", "saveas.html"); // define a MenuItem as you usually would


saveAsItem.setIconImage(saIcon); // This says saIcon (save_as.gif) will be the Icon
The code for the menu above:
<script type="text/javascript">

var mb = new MenuBar(); // define a MenuBar as normal


// Define some images that we will use later on

var fileImage = new image("file_1.gif");

fileImage.setOverImage("file_2.gif");

fileImage.setClickedImage("file_3.gif");


var openIcon = new image("open_1.gif");

openIcon.setOverImage("open_2.gif");

openIcon.setClickedImage("open_3.gif");

// -----------------------------------------


// Then just build the menu


var fileMenu = new Menu(fileImage);


var openItem = new MenuItem("Open", "javascript:void(0);");

openItem.setIconImage(openIcon);


fileMenu.add(openItem);

mb.add(fileMenu);

document.write(mb);

</script>
That's it for this lesson, Lesson 4a shows you how to add tooltips to your objects.